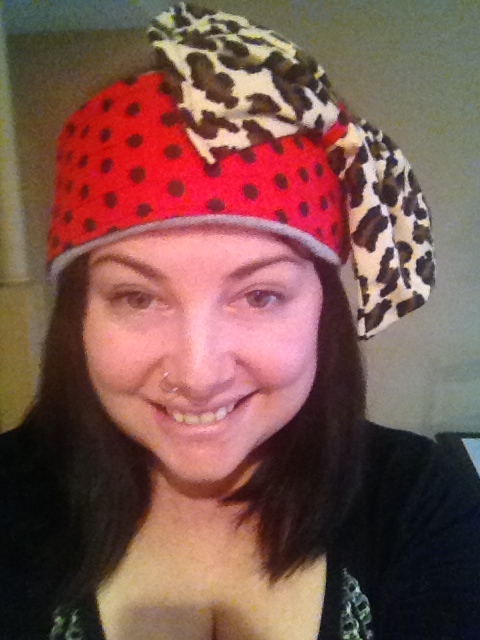
I always have been , and always will be a fan of over exaggerated head pieces. I am an even bigger fan of animal print. Today thine students, we shall bond the two in a holy union! Here is what your finished product will look like !


WHAT YOU NEED


This is an elastic band that I had left over from a skirt I made a while back. This is a 1'' strip that you can find at any crafting store for under $5 .
Now, I listed the prices for these supplies but it is all things that i have used on previous projects. Hence, this weeks commandment.
The Second Commandment - Always save your scraps! Some might call you a hoarder, but I prefer to call myself FRUGALLY RESOURCEFUL. This entire project was done with objects I already owned. Free Crafts are the Best Crafts.
1.) I took my Gray headband and cut it so it looks like a tube. I did this because I knew once i sewed on the red fabric the headband would lose it's stretch. Also, much easier to sew a tube . I Turned in the edges and did a quick stitch so it would not fray.
2.) Next I took my red fabric and cut a long rectangle , a little longer and wider than the headband itself. Why? because everyone needs wiggle room. especially me. I did some eyeball measuring and pinned my red fabric into the shape I wanted. I wanted the gray from the headband to act as a border so I left about an inch showing. But you can do as you wish! sew along the edges.
3.) Sew your red fabric rectangle onto your headband.
This is what you should have at this point.

4.) Time To add your elastic. Now I started with about 12 '' of elastic and did a guess and test with the length until I found what would be comfortable around my head. I ended up with about a 6'' piece. I then sewed the elastic to each side of my headband using the 'D' stitch on my Singer , for those of you using a sewing machine. Now your headband should be a whole circle again. like this.

5.) For the time being, put your headband aside, because its time for the fun part. Making the bow! So to make my Bow I cut two rectangles 16'' by 12'' . I wanted my bow HUGE. Cut your dimensions in half if you would want a smaller bow. Now You want to lay your rectangles on top of one another, MAKE SURE THE BACK SIDE OF THE FABRIC IS FACING UP ON BOTH SIDES. Make pretend the front side of the fabrics are kissing each other. OK Now you are going to sew the length on both sides. once both sides are sewn , leaving the ends open like a tube, you can turn it right side out. Do a quickie stitch on the ends to close it up. now you should have a long rectangular piece that we are going to pinch in the middle, like so:
Going from This

To this :

Put a few hand stitches through the scrunch to secure the bow shape.
6) Okay, at this point I plugged in the glue gun because I was sick of sewing . I cut a small piece of the red fabric to put around the center of the bow. Hot Glued That sucker in place. I Then took my finished bow and Hot Glued it to the headband and ........................... HALLELUJAH ! We're Done!
Total Time : about 2 hours. always take into consideration I am easily distracted my cheese sticks and Arrested Development.
Total Cost : About $15 if you needed to grab a headband and some fabric. If anyone has questions , leave it in the comments! I am more than happy to answer. And feel free to spread the good word of the glue gun bible with friends!
As Always My Friends, Craft On and in the name of The Glue Gun, The Glitter and the Crafty Spirit, Amen.


